Learn how to make the best brined chicken wings with this amazing recipe with helpful tips for crispy skin.
I’ve tested and perfected brining methods for various cuts of meat and now I’m bringing you my best brined chicken wings. I’ve tested a bunch of different methods, using a dry salt brine and a wet salt brine, and also using baking powder. The best version is below and results in tender, flavorful wings with deliciously crispy wings. You don’t even need to fry these, they just bake in the oven!
If you have another cut of chicken, make sure to find out how to brine chicken thighs and chicken breasts for specific timing information.
Read on to get my testing results and all the tips you need, or click here to head straight down to the recipe.
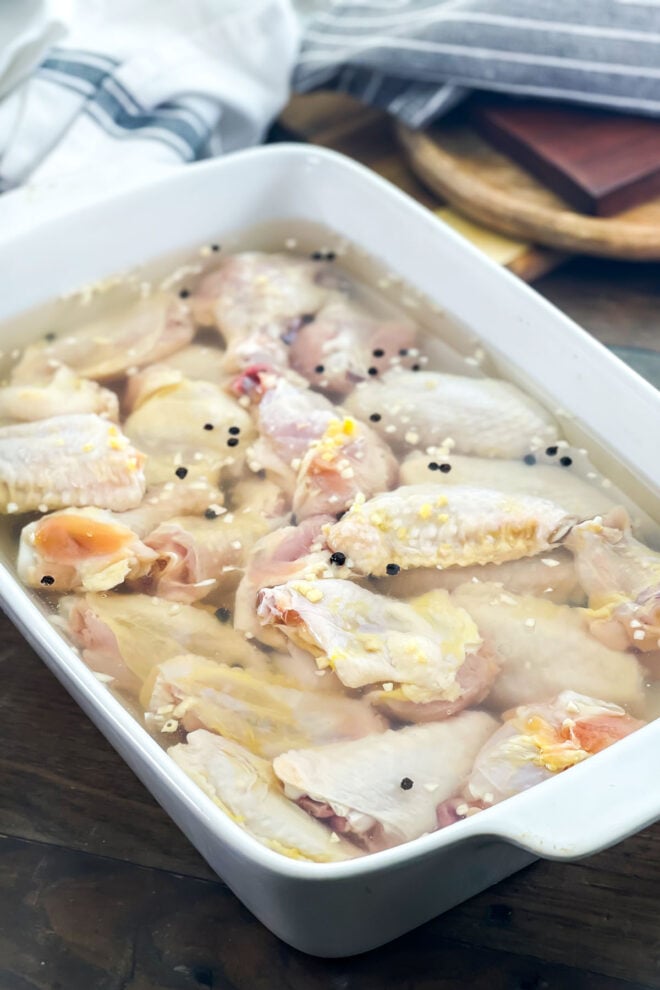
What Is Brining?
First things first, what is brining and why do we do it? Brining is simply soaking your meat in a salt water solution before cooking it. You can also dry brine, which skips the water and puts the salt directly on the outside of the meat. Either way, the process can change the texture to be more tender, and the salt penetrates right into the fibers of the meat to give seasoned flavor throughout.
Do Chicken Wings Need To Brine?
I have been on a quest to find the best way to brine various kinds of meats. I’ve tested and found the best way to brine chicken breasts, the best pork chop brine, an amazing dry brine for whole turkeys, and the most flavorful wet turkey brine. But since chicken wings are dark meat and are usually tender, do they really require a brine?
Well, they may not absolutely need to be brined before cooking, but it certainly has its benefits. Brining your wings gives you incredibly tender meat, and seasons them all the way through, for extra mouthwatering flavor. And, with the technique I’ve figured out, you get crispy skin too!
What’s The Best Brine For Wings?
Of course, I wasn’t going to give you a brine recipe without first doing extensive testing. I decided to test multiple brines against my most popular wing recipe, Crispy Oven-Baked Chicken Wings, which is on my other site TheCookful. In that chicken wing recipe, the chicken gets tossed with baking powder and salt but does not brine, then they immediately go into the oven. The baking powder changes the pH of the chicken wing, resulting in wonderfully crispy skin without frying.
With that information as my starting point, I decided to do dry and wet brines, both with and without baking powder to see which would yield the absolute best results.
With the dry brines, I brined for 4 hours with salt as well as with baking powder and salt. The wet brines went for two hours, also testing with and without baking powder. You can see how the chicken wings looked after each kind of brine below.
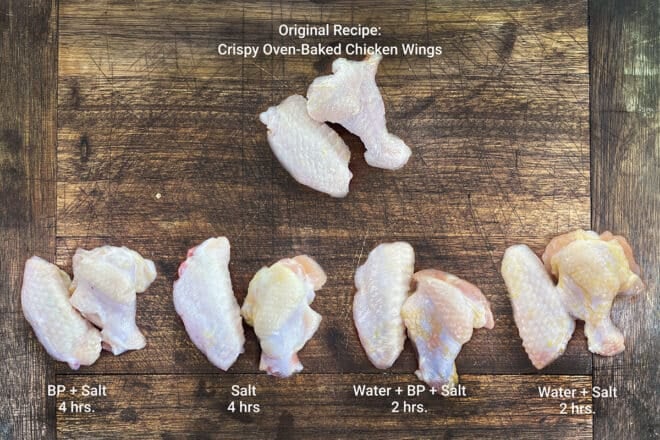
After the chicken wings brined, they all got baked according to my original recipe so that they could be compared accurately to my control wings. So which version won the test taste?
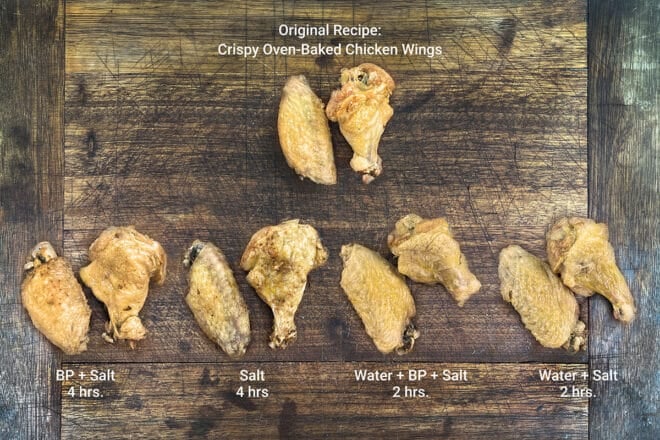
Testing Results
The standard wet brine for 2 hours yielded wings that were perfectly seasoned and tender. However, while the skin was crispy on top, it was slightly leathery underneath and after being out of the oven for half an hour, was not crispy at all.
The wet brine with baking powder added to it seemed to thin out the skin a bit. That skin then ended up crispy all the way through and there was even some bubbling like you see in deep fried chicken wings. There was no taste of baking powder, which some people have an issue with the classic recipe that we’re using as a control. These wings also ended up incredibly tender with great flavor. They did start to go leathery after half an hour of sitting out.
With the standard dry brine of just salt on the wings for 4 hours, the wings were initially crispy after coming out of the oven. However, moisture and fat continued to be drawn out and within minutes of being out of the oven, they lost crispiness and the skin became leathery.
For the dry brine of salt and baking powder, I was surprised to find that the wings didn’t actually turn out very crispy at all. The flavor was pretty good, but they barely got crispy and definitely didn’t stay crispy after pulling them out of the oven.
Conclusion
Using a wet brine with added baking powder and brining the wings in it for two hours will give you delicious, tender wings with amazingly crispy skin. All the wings started to lose crispiness as they sat out, so it’s best to enjoy them immediately.
How To Make The Best Brined Chicken Wings
Now that we know which approach is best for brined chicken wings, let’s get going!
Make your chicken wing brine by mixing together three tablespoons of salt and one teaspoon of baking powder (don’t substitute baking soda, it won’t be the same) in 4 cups of cool tap water. This is enough for 20 wing pieces – the flats and drumettes from 10 whole wings. You can follow this guide for cutting chicken wings if yours are whole.
Submerge the wings in the brine and store in the fridge for two hours. When they are almost ready, get your oven preheating to 250°F and get your sheet pan prepped. You will want to line it with aluminum foil and place an oven-safe wire rack on top.
Transfer your brined wings to the baking sheet and arrange so they aren’t crowded. It’s important NOT to rinse or pat the wings dry after removing them from the brine so that the salt and baking powder stays on the skin. The skin will dry itself out in the oven during the low-temperature 30-minute baking time.
After 30 minutes, increase the oven temperature to 425°F and continue baking until golden brown and crispy, 40-50 minutes. Remove them from the oven and toss in sauce if desired. They’re so nice and crispy though, that my preference is to skip the sauce and just do a bit of seasoning. Serve and enjoy immediately!
Podcast Episode: Brining Chicken Wings
Listen to learn how to make this recipe, along with some great tips from Christine:
Listen to more Recipe of the Day episodes here.
Print
Best Brined Chicken Wings Recipe
- Prep Time: 15 minutes
- Brine Time: 2 hours
- Cook Time: 80 minutes
- Total Time: 3 hours 35 minutes
- Yield: 4 servings 1x
- Category: Appetizer
- Method: Baked
- Cuisine: American
DESCRIPTION
Start with a brine and then bake your way to amazingly tender chicken wings with crispy skin.
Ingredients
- 4 cups water
- 3 Tbsp. table salt
- 1 tsp. aluminum-free baking powder (NOT baking soda)
- 10 whole chicken wings, cut into flats and drumettes (here’s how to do it) for 20 wing pieces total
Instructions
- In a large container or casserole dish stir together water, salt, and baking powder until salt is fully dissolved.
- Add chicken wings, making sure that they are fully submerged. Refrigerate wings in the salt mixture for 2 hours.
- Preheat oven to 250°F.
- Line a sheet pan with aluminum foil. Place an oven-safe wire rack on top of foil-lined pan. Spray lightly with cooking spray or rub with cooking oil.
- Remove wings from brine and place on the wire rack, do not pat wings dry. Place the sheet pan with rack and wings into oven and bake for 30 minutes.
- Increase oven temperature to 425°F and continue baking wings until golden brown and crispy on the outside, 40 to 50 minutes more.
- Remove sheet pan from oven. If desired, toss wings in sauce. Serve immediately.
Love this recipe? I’d appreciate it if you could scroll down and add a *5 star rating* to help others know they’ll love it as well!




Am wondering what temp can I can air fry and for how long, should the wings be turned?
Made a large 2-tray batch of these for a Super Bowl party (probably 3 times as many as our air fryer would hold). Seemed like a long time to bake, but they came out crispy browned but still moist, well seasoned, and ready for tossing with sauce. I flipped them over and rotated the trays around midway through the high-temp baking session, finishing skin side up. The bottom tray needed an extra 5 min to get the same browning. I’ll still air-fry small batches, but this is a great alternative!
So happy to hear it, Jay! Thanks for sharing how that worked out for you.
Do you think that I could do the 30 minutes at 250F and then transfer them to an air fryer to finish them instead of turning up the oven?
Mary, Yes, I think that would work. You just can’t put as many of them in the air fryer as you can in the oven.
Hi,
Can I brine these overnight, or is that too long?
Thanks
Chris, I’ve never tried leaving them that long but I think they’ll end up way too salty.
Could I hit these with a dry rub before I bake them? Thank you so much for the awesome tips! I use your original method (tossing in baking soda and salt right before baking) and I have gotten SO many compliments on them.
Miranda, I’m so happy you like the recipes and tips! Yes, you can do a dry rub before baking them. Just don’t include any salt or baking powder in the dry rub since that’s already in the brine. If you try it, come back and let me know what you think!
I’m confused by your comments here that the dry brined recipe did not turn out very crispy, yet your dry brined recipe article says that they are sooo crispy. I guess I’ll have to try them both ways and see for myself.
That said, thanks for providing a lot of good information and comparisons.
Paul, you’re onto something here. The recipe about crispy wings that you’re referring to has you toss the wings with baking powder and salt and then bake them immediately. They’re therefore not really brined. For the one above that didn’t turn out as crispy, the wings are mixed with baking powder and salt and then refrigerated for 4 hours (the brining time). I think I need to do a side-by-side test of these two conditions to get a better idea of what is going on. At this point, the best wings are either the wet brine with baking powder described above, and the wings with baking powder and salt that are baked immediately (not allowed to brine).
Excellent
Thank you, Keya!
? Can I put frozen chicken wings in this brine
Susan, I don’t think the brine will start penetrating until the wings thaw. If I was doing this, I’d thaw the wings first and then put them in the brine. I think you could thaw the wings in the brine mixture, but I’m just not sure of the timing. The first bit of time in the brine would not be penetrating, just thawing the wings. Here is what I would try: Put the frozen wings in a bowl with the brine and put it all in the fridge. Stir it every 15 minutes and see if the wings are mostly thawed. Once they are mostly thawed, continue to keep them in the fridge in the brine for another 90 minutes. If you try it, come back and let me know how it turned out.