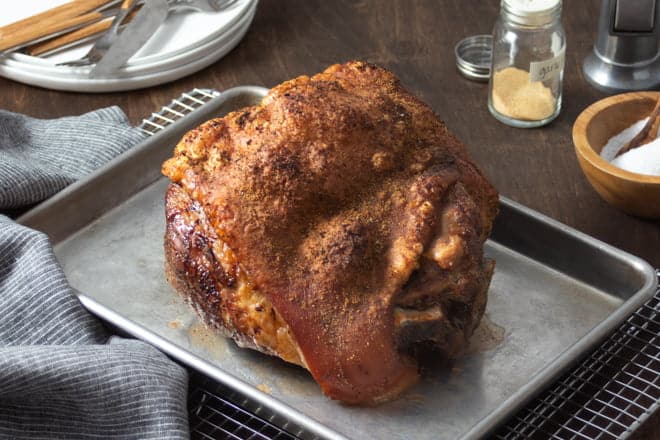
Looking for juicy, succulent pork with crisp, crackling skin? Look no further than my slow-roasted pork shoulder.
You’ve made pork chops and pork tenderloin. You’ve made pork loins and rib roasts. Maybe you’ve even made a pork butt. But have you ever tried roasted pork shoulder? If you love juicy, tender meat and crisp, crackling skin, this is the pork roast for you!
Want To Save This Recipe?
Enter your email address & I’ll send this recipe straight to your inbox to save for later! Plus, you’ll get new recipe ideas from me every week!
What Is A Pork Shoulder?
There are a lot of pork cuts you’re probably familiar with, and then there might be a few that might be confusing to you. And it’s no wonder—it’s confusing! So let’s (to use a butchery term) break it down.
A butcher initially separates the meat into major muscle groups, known as primal cuts. The pork shoulder is a primal cut from the shoulder of the pig. That shoulder is then typically broken down into two smaller, or sub-primal, cuts, ones that you’d typically see at the store—the pork butt, aka Boston butt, and the picnic shoulder, sometimes just called a shoulder.
In other words, the butt is nowhere the tail of the pig—confusing! (See this post for how part of a shoulder cut got called a butt). And “shoulder” can refer to the whole primal cut or one of the sub-primal cuts—also confusing!
To reduce confusion from here on in, we’ll refer to the sub-primal shoulder cut as the picnic shoulder. Elsewhere you might sometimes see it called a picnic roast.
What’s The Difference Between a Boston Butt And A Picnic Shoulder?
Because the butt comes from higher up on the pig, closer to the backbone, it isn’t a muscle that gets a lot of work. That means it’s comparatively tender. Also compared to a picnic shoulder, its fat marbling is more even.
The picnic shoulder is directly below the butt, more down the leg of the pig. So the muscle gets more work, making the meat is comparatively denser and tougher.
All that said, both are relatively tough cuts that will mostly benefit from low, slow cooking methods, like braising, slow-cooking, and slow-roasting—methods that will turn toughness into succulent deliciousness.
When Should You Use Which?
Although they’re relatively interchangeable in recipes, each cut does have characteristics that make it ideal for certain situations.
Because of a Boston butt’s well-dispersed fat, it’s ideal for pulled pork. It can typically be found bone-in and boneless, so if you prefer one or the other, you have that option. And it’s tender enough that it can be cut into steaks and grilled.
On the other hand, a picnic shoulder is typically only available bone-in. So it’s best cooked as a roast. The bone will help the meat stay moist, but along with the cut’s irregular shape, it can make a picnic shoulder hard to carve. So this cut is best enjoyed as hunks pulled or cut off the bone.
Perhaps best of all, a picnic shoulder typically comes skin-on. Which not only helps keep the meat moist, it results in crisp, crunchy skin. So if you like cracklings with your chunks of slow-cooked meat, this is the cut for you. (You also might like this recipe for crackling crisp pork belly.)
BUT there’s a caveat to all of what I’m saying here. There are regional differences in how these cuts are named, butchered, and sold. So you might find variations on all of the above depending on where you live.
Roasting A Picnic Shoulder
To cook a picnic shoulder, I use my basic reverse sear method for roasting pork, but slightly exaggerated. In other words, the initial roast is a little lower, to better break down the sinew and make it meltingly tender. And the finishing reverse sear is a little hotter and longer, to better crisp up that skin. If you want a bolder flavor, you can try using my Homemade Pork Rub in place of the seasonings in the recipe card.
On the side, serve gravy, barbecue sauce, salsa, or chimichurri for dipping—plus plenty of napkins. Get my Homemade Pork Gravy recipe too.
Enjoy! – Christine :)
Podcast Episode: Roasting Pork Shoulder
Listen to me explain briefly about how to roast pork shoulder, along with some other great tips, by clicking the play button below:
Listen to more Recipe of the Day episodes here.
PrintRoasted Pork Shoulder Recipe
- Prep Time: 10 minutes
- Cook Time: 5 hours 15 minutes
- Total Time: 5 hours 25 minutes
- Yield: 8–14 servings 1x
- Category: Entrée
- Method: Baked
- Cuisine: American
DESCRIPTION
Looking for juicy, succulent pork with crisp, crackling skin? Look no further than this slow-roasted pork shoulder.
Ingredients
- 1 bone-in skin-on pork picnic shoulder (6 to 10 lbs.)
- 2 tsp. garlic powder
- 2 tsp. salt
- 2 tsp. pepper
- Low or no-sodium chicken broth
Instructions
- Let the pork sit at room temperature for 30 minutes to an hour. Preheat the oven to 275°F.
- Meanwhile, mix together the garlic powder, salt, and pepper. Sprinkle it all over the pork.
- Put the pork in a large roasting pan, skin-side-up. You do not need a rack in the pan.
- Add about half an inch of broth to the pan.
- Roast uncovered until the internal temperature is 180°F, 45 to 55 minutes per pound. This may seem high for pork but your goal is really tender, slow-cooked pork, almost like the texture of pulled pork.
- If at any point most of the broth has evaporated, add more. Add enough to cover any browning on the side of the pan from where the previous broth evaporated away. This will dissolve that browning and flavor your gravy (if you make it).
- Remove from the oven and let rest for 30 minutes. (If you plan to make gravy, transfer the pork to a plate and use the drippings for the gravy—here’s how.) This is important because this is the only time the meat will rest. The pork does not need to be covered during resting time.
- Preheat the oven to 500°F.
- Put the pork in a clean roasting pan or on a rimmed baking sheet and roast uncovered until the skin is crisped and puffy, 10 to 15 minutes, rotating the pan every 3 to 5 minutes (cover any parts that are getting overly browned with foil).
- Cut or pull the pork into hunks and serve immediately. Do not let it rest now since it has already rested.
Love this recipe? I’d appreciate it if you could scroll down and add a *5 star rating* to help others know they’ll love it as well!