I’ve done a series of experiments to find out how best to brine chicken breasts. What kind of salt should you use? Cold or warm water? And, most importantly, how long do the chicken breasts need to brine for? I’ve tested it all and have the answers for you here!
No dry, tasteless chicken here! I’ve done all the testing for you, so you can cook your best chicken breasts ever. It’s quicker and easier than you think. Once you’ve experienced it, you’ll wonder why you didn’t start doing this earlier! And if you have thighs instead, read the specifics on brining chicken thighs.
- Video: Brining Chicken Breasts
- What is Brining and How Does It Work?
- What Goes In A Brine?
- Should My Brine Be Warm Or Cold?
- How Long Should I Brine Chicken Breasts?
- Can You Freeze Brined Chicken Breasts?
- How To Cook Chicken Breasts After Brining
- Podcast Episode: Brining Chicken Breasts
- Recipe: How To Brine Chicken Breasts

Want To Save This Recipe?
Enter your email address & I’ll send this recipe straight to your inbox to save for later! Plus, you’ll get new recipe ideas from me every week!
Video: Brining Chicken Breasts
What is Brining and How Does It Work?
Brining is simply soaking your meat in a salt water solution before cooking it. It’s been debated in the culinary literature about what is actually happening here, and scientific words like osmosis and diffusion are used quite a bit. But what we do know is that using a brine changes meat in three ways.
First, meats soak up salt water more easily than plain water. Therefore, what you’re doing is adding moisture to the meat, which, once it’s cooked, makes the meat itself seem moister.
Second, the salt changes the texture of the meat. It’s a type of denaturing. So, meat that is brined also has a more tender texture.
Finally, because we’re working with salt and because that salt is dissolved in water and then getting right into the meat, when you brine something, you are essentially seasoning it on the inside.
All of that is going on and the result is meat (or chicken breasts, in this case) that are juicier, more tender, and more flavorful. It’s a win-win-win!
You can read more about the science behind brining and the osmosis debate here.
Note that there is another way that you can brine chicken breasts and other cuts of meat. It’s called a dry brine and doesn’t use water. Instead, you sprinkle the meat with salt and leave it uncovered in the fridge. It’s actually a very convenient technique to learn, but is not what we’re talking about here today. If you’d like to learn more about dry brining, head over here. Note that dry brining is especially useful for large pieces of meat, like turkey, since you don’t need to find a large container to hold them and the water. Learn how to dry brine a turkey here.
What Goes In A Brine?
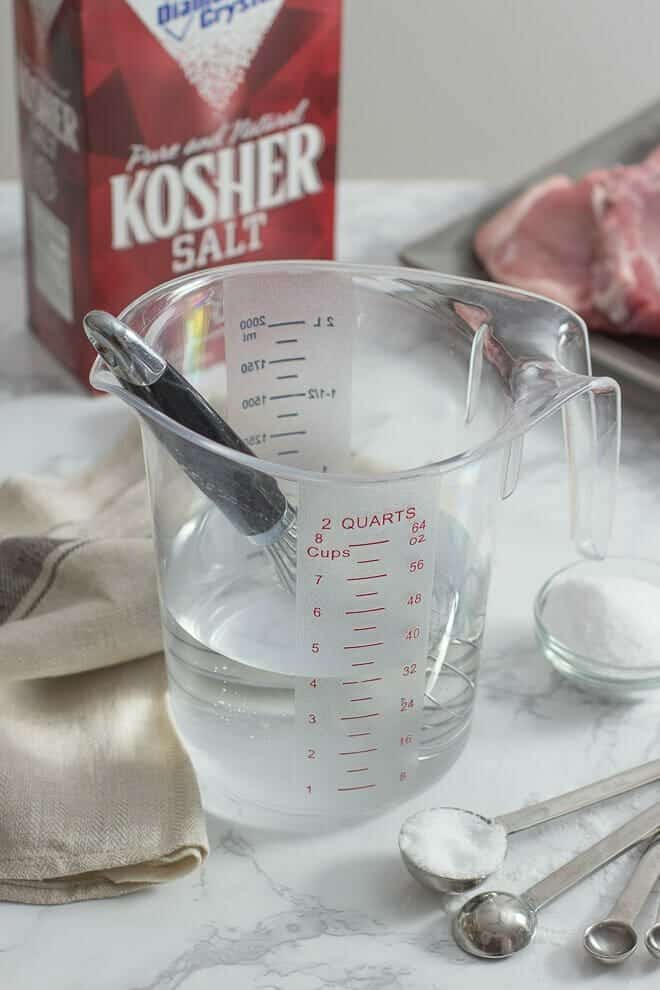
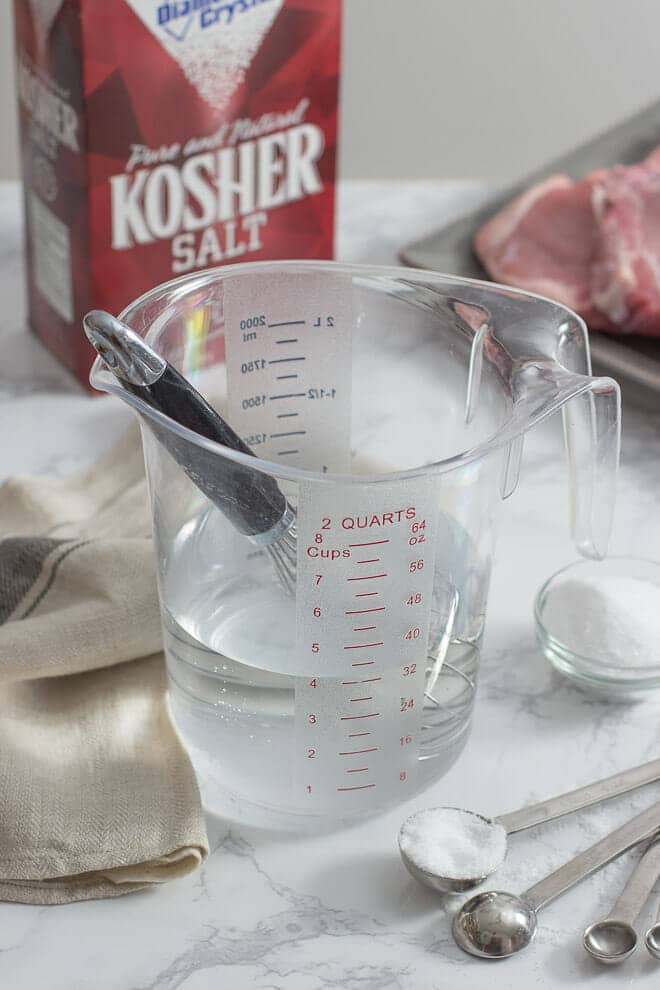
All that is needed for a brine is salt and water. Sometimes additional seasonings or sugar are added as well. I used my standard brine recipe for testing, which yields enough brine to cover about four chicken breasts.
My standard brine recipe is essentially: 4 cups of cold water and 6 tablespoons Diamond Crystal kosher salt OR 4 1/2 tablespoons Morton’s kosher salt OR 3 tablespoons fine or table salt.
Note that it really matters what kind of salt you have and how much you use. The salt crystals in these types are all of different sizes and if you use the incorrect type or incorrect amount, you will end up with a brine that is either way too salty or not salty enough.
To make the brine, all you need to do is mix together the salt and the water. It’s a large amount of salt though so it can take a minute or two for it to dissolve. It will though. Just stir it together and keep stirring until it’s less cloudy and there’s no more salt undissolved at the bottom.
Some people like to add optional ingredients for flavor such as peppercorns, crushed garlic, rosemary, thyme and/or sage sprigs, bay leaves, whole cloves, or other herbs and spices. I don’t think it really adds much flavor to chicken breasts though, because it’s a shorter brine time than you would do for things like a whole chicken or turkey.
However, as you’ll see below, the sweet spot for brining chicken breasts is 30-60 minutes. If I know I’m going to have mine in the brine for 60 minutes, I add in 1 tablespoon of garlic granules. The full hour with the chicken in the garlicky salty brine is seriously amazing! Also, if I’m going to brine for 60 minutes and I want to impart even more flavor into the chicken breasts, I’ll use my extra-flavorful food processor brine, which I developed for brining turkey. It’s the best turkey brine out there, full of onion, garlic, and fresh herbs, combined in a way that really gets the flavors into the meat.
Should My Brine Be Warm Or Cold?
One of the first tests that I did was to compare the use of warm tap water to cold tap water in the brine. The reason for doing this is that there’s a popular baked chicken breasts recipe over here that swears by using warm water in the brine. I was really disappointed that it didn’t work for me though, not with any of the different times that I tested. When compared with the cold water brine, the warm-brined chicken breast was less tender and less juicy than the cold-brined chicken breast after baking.
So, the answer is to use cold tap water in your brine. Why might this be the case?
While I’m not a food scientist, my best guess is that the warm water expanded the molecules on the outside of the chicken which prevented as much penetration of the brine into the chicken. The warm tap water did help the salt dissolve more quickly, but that seemed to be the only advantage to this method.
In one of the 15-minute warm brine tests, I also added aromatics like fresh onion slices, garlic, and herbs to see if the warm water would help these flavors penetrate and infuse the chicken breast the same way they would with longer brining times. Unfortunately, they did not.
How Long Should I Brine Chicken Breasts?
For this part of the brining experiments, I wanted to compare chicken breasts that had been brined for different amounts of time. As mentioned, the brining solution I used for testing is my standard brine recipe, with cold tap water. I’ve also done similar tests for brining pork chops as well as brining pork loin and my pork tenderloin brine, so make sure to take a look at those results as well.
Note that for the 15-minute version, I placed the brine and the boneless skinless chicken breasts into a bowl and left it right on the counter to soak. 15 minutes is a safe amount of time for the chicken to be left out. You can also leave it on the counter if doing a 30 minute brine. Any longer than that, and you should refrigerate the chicken in the brine to keep the food safe from bacteria like Campylobacter and Salmonella.
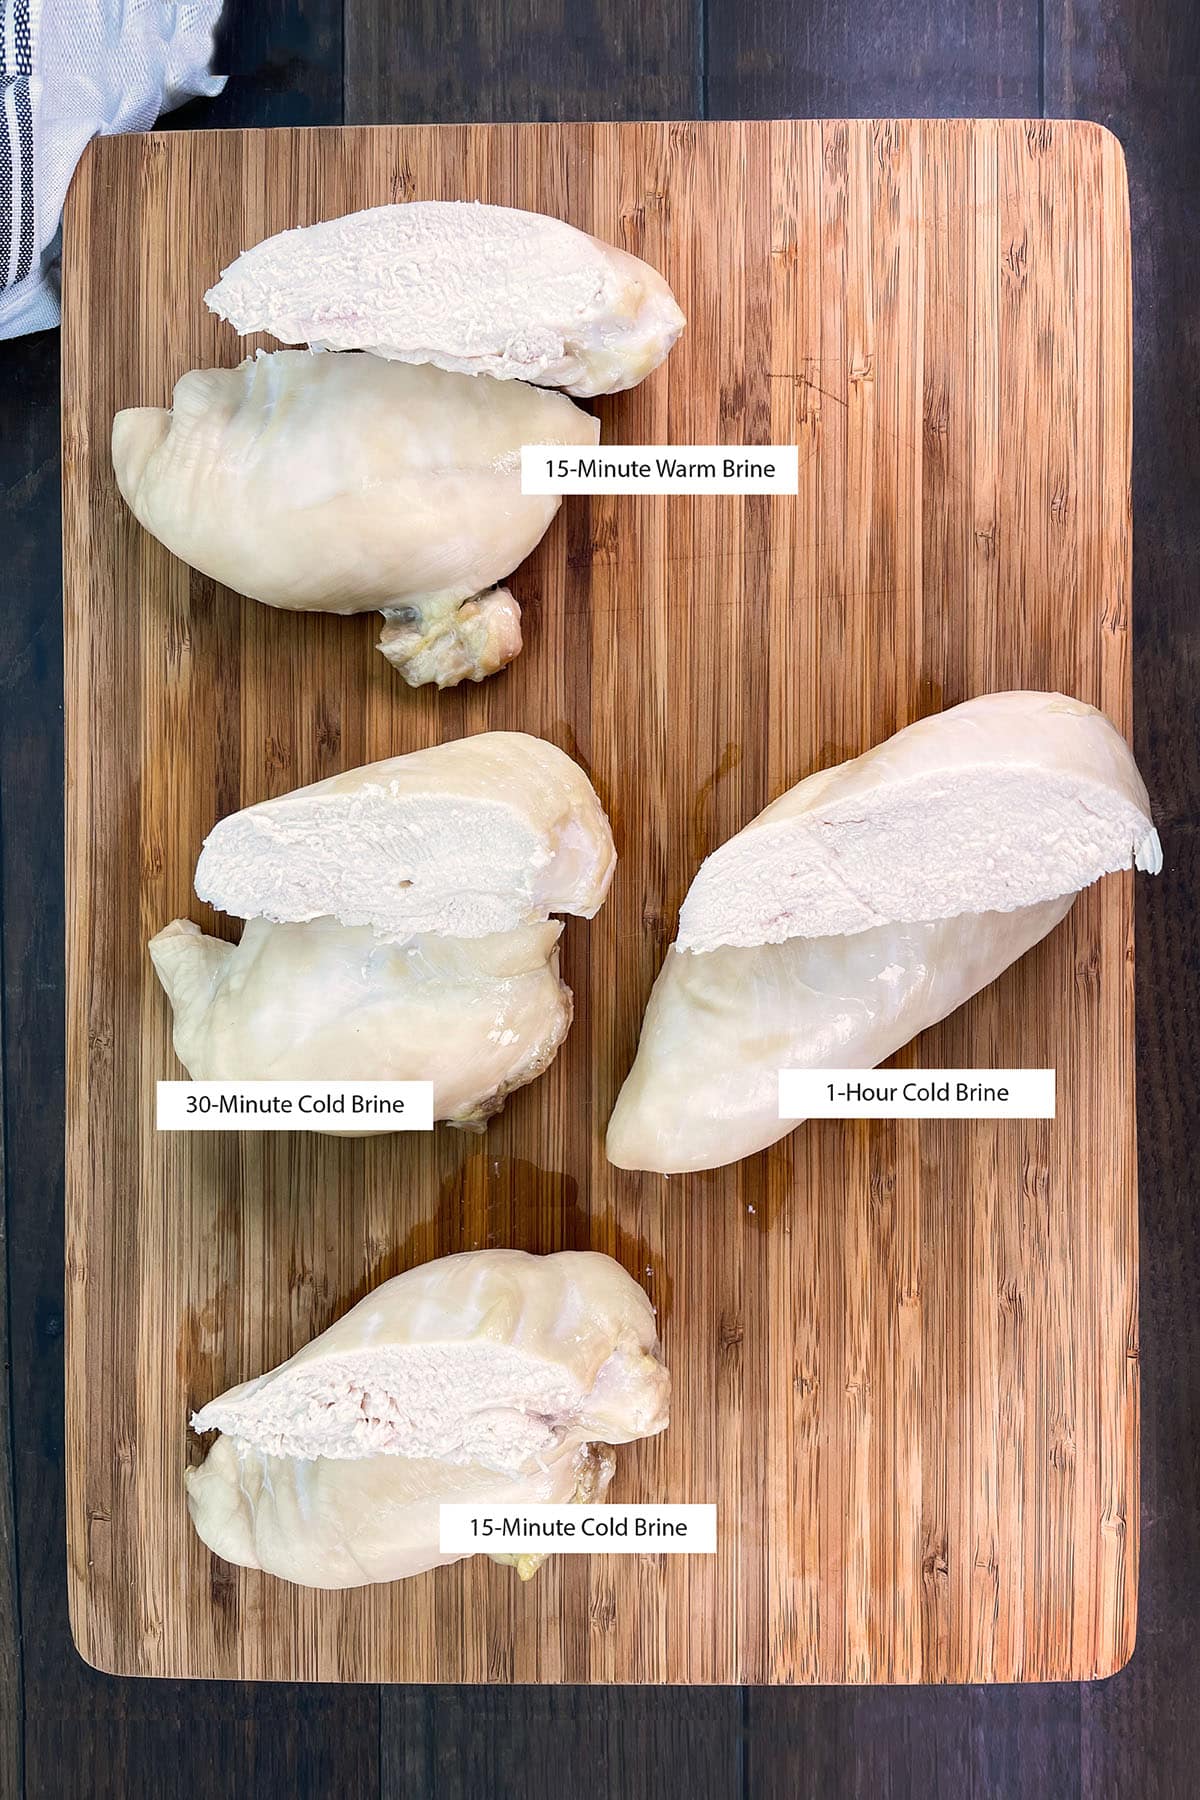
In the chart below, I share my results of testing the brine for various times. You’ll see that the sweet spot is between 30 minutes to one hour.
Chart: Chicken Breast Texture and Flavor After Different Amounts of Time in Brine
| BRINING TIME | RESULTS |
|---|---|
15 minutes | Lightly salted flavor, no detectable change in texture. |
30 minutes | Lightly salted flavor, slightly more tender than the 15-min brine, no detectable change in texture. |
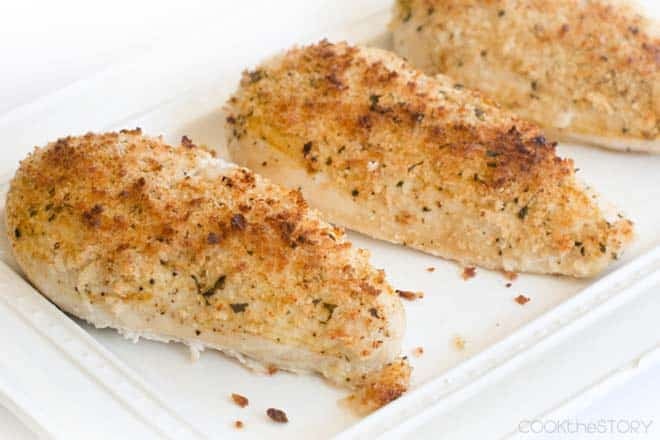
1 hour | Perfectly seasoned, juicy, tender, noticeable difference in texture and tenderness. See picture below. |
2 hours | On the edge of being overly salty, but not off-putting, especially if it will be served with a sauce or other things. Very juicy and tender. The texture is similar to the 1 hour brine. |
4 hours | This is too salty for me. It might be okay if mixed with mayonnaise for a chicken salad, but in my opinion, it’s too salty to be eaten on its own. The texture is significantly different, more like deli meat. |
8 hours | I couldn’t get through a bite of this, it’s just too salty, and the texture is almost spongy. |

Can You Freeze Brined Chicken Breasts?
Yes! You can brine and then freeze your chicken to be cooked at a later time. Brine the chicken for 30 – 60 minutes, drain the excess brine, and store in the freezer. The brine gets suspended in the meat as frozen water droplets.
I suggest using the chicken within six months, after that there is a chance that the ice crystals will affect the texture of the meat.
How To Cook Chicken Breasts After Brining
After the chicken has been brined, you don’t have to cook it right away. It can be removed from the brine and kept in the refrigerator, covered, for up to three days, or wrapped well and stored in the freezer for up to two months.
When you’re ready to cook, pat the chicken dry but don’t rinse it off. Why not? Rinsing the chicken doesn’t remove any salt from it. All that you really do when rinsing any kind of meat or poultry is increase the amount of bacteria in your sink and kitchen work area. The water bouncing off of the chicken has been shown to cause more bacteria than helping with anything.
From there, you can bake, grill, or use whatever your favorite method for chicken is. I’ve got instructions for a few different methods for you here:
Remember though, you shouldn’t add any additional salt called for in the recipe since you brined first and the chicken is already well-salted.
I hope you learned a lot about brining chicken breasts and I can’t wait to hear how it all works out for you. Plus, if you loved learning about my chicken breast testing, you’ll also enjoy reading about my best brined chicken wings too. Have a great day!
Podcast Episode: Brining Chicken Breasts
Listen to me explain briefly about How To Brine Chicken Breasts, with some great tips along the way, by clicking the play button below:
Listen to more Recipe of the Day episodes here.
Print
Recipe: How To Brine Chicken Breasts
- Prep Time: 5 minutes
- Cook Time: 30 minutes
- Total Time: 35 minutes
- Yield: 4 servings 1x
- Category: Entree
- Method: Stir
- Cuisine: American
DESCRIPTION
After doing a series of tests and comparisons, this is the recipe and method that I’ve found works best for brining chicken breasts.
Ingredients
- 4 cups cold tap water
- 4 and 1/2 Tbsp. Morton’s kosher salt*
- 1 Tbsp. garlic granules (optional)
- 4 (6oz) boneless skinless chicken breasts
Instructions
- In a medium-sized bowl stir together water and salt until salt is dissolved.
- If you are planning to brine for over 45 minutes, stir in the garlic granules (otherwise the flavor won’t penetrate).
- Add the chicken breasts. Make sure they’re all submerged. If not, use a narrower bowl or a zipper bag.
- If brining chicken for more than 30 minutes, transfer brine and chicken to refrigerator. If brining for under 30 minutes, leave on counter.
- Allow chicken to sit in brine for 15 minutes to 2 hours. See chart above to determine optimum time. My preference is 1 hour.
- Remove chicken from brine. Discard brine. Pat chicken dry with paper towels.
- Cook chicken immediately (try these baked chicken breasts or these grilled chicken breasts), or refrigerate covered for 3 days, or wrap well for the freezer and freeze for up to 2 months, and then cook.
Love this recipe? I’d appreciate it if you could scroll down and add a *5 star rating* to help others know they’ll love it as well!
Notes
*Different kinds of salt have different sized crystals so you need different amounts depending on the type. Use 6 tablespoons of Diamond Crystal kosher salt, OR 4 and 1/2 tablespoons of Morton’s kosher salt, OR 3 tablespoons of fine or table salt.


Amazing… changed the way I cook chicken. I will never NOT brine my chicken breast thanks to you ☺️
Thank you, Colin! That’s so nice to hear. :)
Amazing – thank you for doing the testing – I am blown away about the quick process and the perfect result!
You’re welcome, Laura! I was so happy to figure out the perfect results.
could we not use garlic powder instead of granulated ?
Yes, garlic powder and granulated garlic can be used fairly interchangeably. The only difference is that garlic powder tends to be a finer consistency than granulated garlic. And actually, I’ve been noticing lately that some brands of granulated garlic are labelling them as garlic powder, so the distinction is not even really there anymore. I might even edit the above recipe to say garlic powder, since I think more people have something with that label in their pantry. Thanks for a great question, James!
Do I need to rinse the chicken breasts before patting them dry?
No, you don’t need to rinse the chicken, Laura. Thanks for your question!
This was the most tender, most moist chicken. My husband made me promise to always use this recipe! I’ll be back to see more of your recipes and helpful hints.
Thanks so much, Sue! Make sure to sign up for my newsletter for more great recipes in your inbox. :)
Do you have the salt weight, so that people with other salt brands/types can still use your recipe?
Blair, yes, you want 65-70 grams of salt in 4 cups of water.
Hey how much chicken breast can you brine at one time
Qing, you can brine as many as you’d like at once. The amount of brine in the above recipe is for 4-5 chicken breasts that are about 6 ounces each. What I typically do if I want to brine more than that is to put the chicken breasts into the container that I plan to brine them in. Then I make a full batch of the brine and pour it over top. Then I decide how much more I probably need and make another full batch or half a batch and pour that over top. Basically, you need them all to be completely submerged. Just keep making and adding brine until that is achieved.
This is excellent but I just want to mention the shortcut re: salt would be to say how many grams are needed for the quantity of water.
Grace, good point. You’re looking for 65-70 grams of salt dissolved in 4 cups of water.
I am usually skeptical of blog recipes and skew toward taking advice from more traditional sources, but I followed this advice to the T and it was perfect.
One hour. Perfect chicken.
Thank you, Alex! And maybe you’ll consider visiting my recipes here again :-)
First time I brined chicken breasts for lemon pepper chicken and this is now my go to recipe for brining. Thank you so much for the share, my family loved my chicken after this, it came out so juicy and more tender than ever before!
Shauna, you’re welcome! I’m so happy you all liked it. Thank you for leaving a comment t olet me know!
If i’m using thin sliced chicken cutlets, do you think 30 minutes would be good? In other words, does the size of the chicken effect brine time? I guess i’ll find out today! Thank you for the recipe! I’m going to try this today for my chicken parmesan! (Mom’s birthday meal!!!!)
30 minutes should be good, Lindsay. That’s what I found worked well for thin pork chops so I imagine that would work well for chicken cutlets also. Let us know how it goes!
Thank you for taking the time to test this. I plan on using the brine this week. Question though, you mention using your food processor brine for additional flavor. I checked out that post and it sounds very good. Can you please give scaled-down ingredient amounts to use for the chicken brine?
Taj, Great idea! I’ve added a heading to that post (https://cookthestory.com/the-best-turkey-brine-recipe/) with the amounts to make a smaller quantity. Thanks for the comment!
Thank you for giving the timings. The recipes on the internet are all over the place with times. Having this comparison really helps. I’ve tried it now for 30 minutes and agree that it gives nice seasoning. 1 hour with the texture change and full seasoning is my preference. I’m going to try 45 minutes next though!
Cheryl, Thank you for your comment and feedback. I’m delighted to know this has helped you. We have a similar set of tests coming out for pork chops so stay tuned!
We just got a smoker and I was so worried the chicken would be dry. This saved it! The chicken turned out juicy and flavorful
I’m so happy to hear that, Kenzie! Thanks for coming back to comment.
I bought boneless chick breasts from Sams club and their huge! Should I cut them in half? Also, I need to brine about 12 of them so would I triple the salt and water or would that be too much? Thanks!
Tracy, Yes, cut them in half. If you cut them diagonally, they end up kind of looking like regular-sized chicken breasts. Ideally, once they’re cut they’ll be the size of regular chicken breasts too. If they’re a bit smaller, I wouldn’t change the brining time, but you might have to adjust the cooking time. As to the amount of brine, if you use the same concentration of salt, then it doesn’t matter how much you have. What I usually do is put the chicken breasts into a large bowl, then make a batch of the brine and pour it over them. I then get a sense for how much more I need just so they’re all fully covered. I hope that helps!
Can I cut up very large chicken breast into chicken bite pieces before brining? Also would I skip the seasoned buttermilk soak? Thanks
Donna, yes, you can cut it up first. You’ll just brine it for a maximum of 35 minutes. The brine will penetrate too much otherwise.
As to the buttermilk soak, I’m not sure what you’re referring to. This recipe doesn’t call for a seasoned buttermilk soak. I will say that once your chicken is brined according to the above recipe, it won’t need any other salt or any other marinade. You can add salt-free herbs, spices, and seasonings though.
Excellent brine recipe! Left in brine almost an hour then baked with a nice bbq sauce. Thank you for the recipe 🙂
You’re welcome, Allison! Thanks for taking the time to come back and comment.
Very well explained
Easy to follow recipe. But i have a question: my chicken pieces want to float in the brine rather than being submerged. Short of stuffing them with lead, what can I do?
Katharine, Great question. You can try two things. First, do the brining in a ziptop bag. The easiest and least messy way to do this is to put the bag into a large bowl. Add the chicken breasts to the bag, then pour in the brine. Close the bag most of the way and then squeeze a bit to get out the last bit of air. The second thing you can try is a smaller container. I use a 8 cup glass measuring cup most of the time. I find that it only just fits the chicken and the brine, so even if the chicken does rise to the top, it still can’t really escape. A little bit maybe pops out, but I just move them around in there halfway through. Let me know if either of those helps you out. Thank you for the 5 stars and the great question!
This recipe is amazing! I learned so much about brining. So easy and really makes a difference.
Rachel, Brining has really transformed how I cook lean meats. So happy you found it helpful!