How long do you grill chicken breasts for? Do they need to be brined or marinated? How do you get good grill marks? How do you grill the juiciest chicken breasts? All your grilled chicken breast answers are here!
With summer and grilling season coming up, it’s a great time to grill up some chicken as an entree, to put onto salads, or to use in your favorite chicken recipes. It’s therefore a good idea that we take a moment to tackle the conundrum of grilling chicken breasts.
- Video: How To Grill Chicken Breasts
- Why Are Grilled Chicken Breasts Usually Dry?
- The First Step To Juicy Chicken Breasts: Pound Them A Bit
- Should You Brine Chicken Breasts Before Grilling Them?
- Should You Marinate Chicken Breasts Before Grilling Them?
- Easy Marinade For Grilled Chicken Breasts
- How Long Do You Grill Chicken Breasts For?
- How To Grill Chicken Breasts Perfectly
- Podcast Episode About Grilling Juicy Chicken Breasts
- How To Grill Chicken Breasts That Are Sooo Juicy Recipe
Video: How To Grill Chicken Breasts
Why Are Grilled Chicken Breasts Usually Dry?
You probably know that chicken breasts are very lean. Since there’s not much fat in them, it’s hard to keep them juicy on the grill. But, it’s possible! Read on to find out how to make perfect grilled chicken breasts that are juicy, tender, and full of flavor every single time.
Another reason that chicken breasts can be dry is due to the fact that they are not usually an even thickness. This means that the thinnest part tends to dry out before the thickest part is cooked all the way through. There is only one way to fix this and it involves a tiny bit of work, but not hard work. Don’t worry!
The First Step To Juicy Chicken Breasts: Pound Them A Bit
The first thing you need to do to get juicy chicken is to flatten the chicken breasts out to an even thickness. If the chicken breast has a consistent thickness, it will cook more evenly. Note that this is a good idea no matter how you’re cooking your chicken breasts. I’ve recently done a series of little experiments and have found that this step makes a big difference when baking chicken breasts too.
Flattening the chicken breasts a little bit also means that they won’t be on the heat for as long. When chicken breasts are their full thickness, it can take awhile for the heat to penetrate right to the middle. That means that by the time the inside of the chicken is fully-cooked, the outside has dried out. If your chicken breast is thinner because you flattened it a bit, then the outside doesn’t dry out as badly by the time the inside is cooked.
Another perk of flattening the chicken breasts is that any brine or marinade you use will be able to penetrate the chicken more quickly. So putting in the bit of time to get the chicken even will actually result in less time needed overall.
Should You Brine Chicken Breasts Before Grilling Them?
If you want really juicy chicken breasts, then brining them is a sure-fire way to do it. If you flatten the chicken breasts first, as mentioned, then they don’t need very long in the brine. I’ve done a bunch of tests to find the optimum amount of time to brine chicken breasts. Here is a summary of the results:
- Chicken breasts in a salt brine for 15 minutes get enhanced flavor but no change in tenderness or juiciness.
- Chicken breasts in a salt brine for 30-60 minutes get enhanced flavor and become more tender and juicy.
- Chicken breasts in a salt brine for over 90 minutes can become too salt.
The sweet spot is therefore 30-60 minutes.
Here is my brine recipe and full instructions. But to make it easier for you, this is really all you need to know:
- 4 cups of cold tap water
- 4 tablespoons of Morton’s brand kosher salt*
- 4-6 chicken breasts, halved and pounded to an even thickness
*Note: If you’re using a different brand or different type salt, please consult this recipe for the correct measurement of salt because different brands of kosher salt, coarse salt, and other salts are of a different size and require different amounts.
In a medium-sized bowl, mix together the water and salt until the salt is fully dissolved. Then add the chicken breasts. All of the chicken should be submerged. If not, add more brine mixture or use a narrower bowl. Leave it all at room temperature for up to 40 minutes. If brining for longer, you should put it all into the refrigerator right from the start.
Should You Marinate Chicken Breasts Before Grilling Them?
Marinades don’t really tenderize meats (unless they have a lot of salt in them and then are actually brining them). Instead, marinades only add flavor to the outside of the meat. If you want tender, juicy chicken, then I’d use the time to brine the chicken instead.
What I actually like to do the most is to add garlic powder to the brine mixture. You can also add black pepper and other seasonings too. In that way, you’re adding flavor like a marinade would while brining.
The only thing to note is that you don’t want to leave the chicken in the brine anywhere near as long as you would in a marinade. The most you’d want to leave them in there for is 3 hours (if flattened) or 5 hours (if not flattened). Then take them out of the brine and refrigerate them dry until you’re ready to cook them.
If you would prefer to not brine your chicken breasts, you can do a marinade instead.
Easy Marinade For Grilled Chicken Breasts
For 4 chicken breasts (about 1 and 1/2 pounds total) I like to combine the following ingredients in a ziptop bag:
- 1/2 cup olive oil
- 1/4 cup lemon juice
- 2 Tbsp. water
- 1 tsp. salt
- 1 tsp. dried thyme leaves
- 1/2 tsp. garlic powder
- 1/4 tsp. coarsely ground black pepper
You could use a mixture of lemon juice and white wine vinegar, or just cider vinegar instead of the lemon, if you’d like. And you can use a different herb. This one calls for thyme, but dried oregano and dried rosemary are also really nice.
Combine those ingredients in a zip top bag. Then add the chicken to the bag and seal it. Refrigerate for 30-60 minutes or overnight. Remove chicken from the bag, discard the marinade. Grill the chicken according to the instructions below.
Okay, now that we have the prep for our chicken breasts done, it’s time to learn how to grill them!
How Long Do You Grill Chicken Breasts For?
This is the biggest question that I get. It really does end up depending on how thick your chicken breasts are. If you flattened them, as discussed, they’re going to need about 4 minutes per side over direct medium-high heat (about 400°F). If your grill doesn’t have a thermometer, here’s how to find out what temperature it’s at.
After 4 minutes, you flip them over and do the other side for 4 minutes. This is going to get you nice parallel grill marks on your chicken. If you want crosshatched grill marks, after the first 2 minutes, turn the breasts 90 degrees and cook for 2 more minutes. Then flip and do the same thing on the other side, 2 minutes then turn, then 2 more minutes. But note that the crosshatched ones won’t be as dark as the parallel ones. I therefore prefer to just do the 4 minutes per side without turning.
How To Grill Chicken Breasts Perfectly
OK, those are the basics. Now here’s a detailed step-by-step of the whole process. You can scroll down to the recipe if you want the shorter instructions.
Step #1
We’re going to start by cutting the chicken breasts in half. This is especially important if your chicken breasts are really big. The bigger the chicken breasts, the longer they need to be on the grill. The longer they’re on the grill, the drier they will get.
Since back when I took these pictures, I’ve figured out that it’s even better to cut the chicken breasts diagonally. You actually end up with two chicken breast portions that look like chicken breasts, with a pointed end and a flatter end. The portions are of a more equal size as well. If you want to see what I mean, there’s a video over here. Or just cut them in half down the middle. It’ll be fine.
Step #2
Cover one portion in plastic wrap. This just stops chicken juice from flying around your kitchen when you pound it. You definitely don’t want that.
Step #3
Now you’re going to pound it to an even thickness.
Tip: If you have a meat tenderizer with a flat side, like this one, use that. If not, a rolling pin works. On the day I shot this I couldn’t find my meat tenderizer so a rolling pin came to the rescue!
So you just smack the chicken breast, focusing on where it’s thickest and trying to get it to be even with the thinnest part.
The goal is a chicken breast portion that is exactly the same thickness all the way across, like this:
Step #4
Once all of your portions have been pounded to an even thickness, put them into a ziptop bag or a large bowl with your brine or marinade. Note that you shouldn’t use a marinade that has any sugar or honey in it. That will burn on the grill. And note that you can add flavorings even if you’re doing a brine (garlic powder, black pepper, and dried herbs all work really well).
Step #5
Oil your grill grates. There’s great info on how to do that over here. Basically, when your grill is cold, dip paper towel into an oil that has a high-ish smoking point, like vegetable oil or grapeseed oil. Then use tongs to rub that oiled towel onto your grates.
Then preheat the grill for direct cooking over medium-high heat (around 400°F). If your grill doesn’t have a thermometer, here’s how to find out what temperature it’s at.
Once your grill is at the right temperature, remove the chicken breasts from the marinade or brine, shaking off any excess. If brining, pat the meat dry. Throw out the marinade/brine.
Put the chicken breasts on the grill in a single layer, as spaced out as you can given your surface and the number of breasts you have. You can leave the grill lid open while cooking.
Step #6
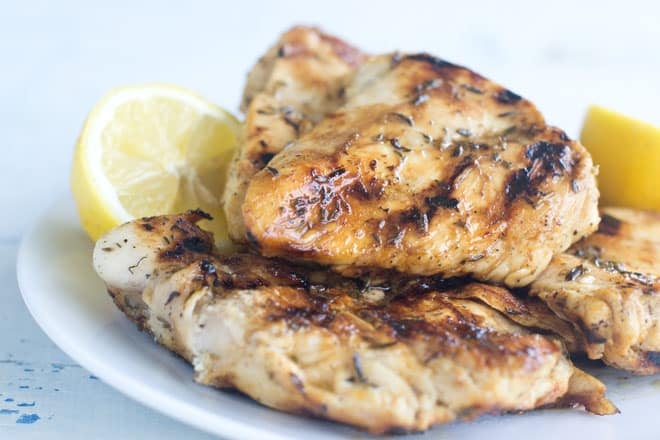
They’re going to take about 4 minutes per side. Test if they’re done using an instant-read thermometer. You want it to read 165°F. Or you can cut into one and see if it’s white all the way through, not pink. They’ll be nice and brown with good char marks when they’re done. Like this:
Step #7
Take them off of the grill and put them on a clean serving plate. Let them rest for 5 minutes before serving. This resting time is so that the juices won’t rush out of the chicken when you cut in for that first bite.
Below are the instructions in printable form for you. Enjoy! -Christine :)
Podcast Episode About Grilling Juicy Chicken Breasts
Listen to me explain briefly about how to make this chicken, with some great tips along the way, by clicking the play button below:
Listen to more Recipe of the Day episodes here.
PrintHow To Grill Chicken Breasts That Are Sooo Juicy Recipe
- Prep Time: 1 hour 10 minutes
- Cook Time: 8 minutes
- Total Time: 1 hour 18 minutes
- Yield: 6–8 servings 1x
- Category: Entrée
- Method: Grilled
- Cuisine: American
DESCRIPTION
Learn the method for how to grill chicken breasts that are super-juicy, and never ever dried out.
Ingredients
- 4 boneless skinless chicken breasts (about 1 and 1/2 lbs.)
- 4 cups cold water
- 4 Tbsp. Morton’s kosher salt*
- 2 tsp. garlic powder
- 1 tsp. dried thyme
- 2 Tbsp. vegetable or grapeseed oil
Instructions
- Cut the chicken breast in half width-wise. Cover one portion in plastic wrap to stop chicken juice from flying around your kitchen when you pound it.
- Pound it to an even thickness. If you have a meat tenderizer with a flat side, like this one, use that. If not, a rolling pin works. So you just smack the chicken breast, focusing on where it is thickest and trying to get it to be even with the thinnest part. Set chicken aside a moment.
- Into a medium-sized bowl measure the water and salt. Stir well until salt is dissolved. Add the garlic powder and thyme. Stir.
- Add the chicken breasts to the salt mixture. Make sure all of the chicken is submerged. If not, use a narrower bowl, or mix up a bit more brine mixture and add it. Cover bowl with plastic wrap and refrigerate for 15 minutes to 2 hours.
- Take the bowl of chicken out of the refrigerator. Remove chicken from bag and pat dry. Discard salt mixture. Allow chicken to sit at room temperature for 10-15 minutes while you prep and heat the grill.
- Oil your grill grates: When your grill is cold, dip paper towel into an oil that has a high smoking point, like vegetable oil or grapeseed oil. Then use tongs to rub that oiled towel onto your grates.
- Preheat the grill for direct cooking over medium-high heat (around 400ºF). If your grill doesn’t have a thermometer, here’s how to find out what temperature it’s at.
- Once your grill is at the right temperature, put the chicken breasts onto the grill in a single layer, as spaced out as you can given your surface and the number of breasts you have.
- Cook for about 4 minutes per side with the grill lid open. Test if they’re done using an instant-read thermometer. You want it to read 165ºF. Or you can cut into one and see if it’s white all the way through, not pink. They’ll be nice and browned outside with good char marks when they’re done.
- Take them off of the grill and put them on a clean serving plate. Let them rest for 5 minutes before serving. This resting time is so that the juices won’t rush out of the chicken when you cut in for that first bite.
Love this recipe? I’d appreciate it if you could scroll down and add a *5 star rating* to help others know they’ll love it as well!
Notes
*If you’re using a different brand or kosher salt or different type salt, please consult this recipe for the correct measurement of salt because different brands of kosher salt, coarse salt, and other salts have differing sized crystals and require different amounts.
This post originally appeared in August 2016 and was revised and republished in April 2022.